
Pixellab is an application that can be downloaded for free on Android devices and is used to quickly and easily construct posters and write text over images. The app’s primary purpose was to allow users to write text on photos, but given its abundance of helpful features, it is possible to accomplish much more with it.
The application may be downloaded from the Google Play Store. You can also download its premium version from our website, and then you can use it. We have discussed its features and the several ways it may be utilized. Look at the helpful hints and educate yourself on how to use Pixellab.
How to Use Pixellab App
You will be greeted with a straightforward user interface when you open the application. Simply clicking on the three dots in the upper right corner of the app will load a photo into the backdrop of the app. When you choose it, a menu item labeled “Import photos” will appear for you to select. Using this method, you can import a picture into the backdrop.
The trend these days is to post images on social media with different words put on them. Launching the application will notice a “Pencil” icon to the left of the button labeled “Delete.” To add text to your photo, select the “Pencil” icon from the toolbar and then type your text in the box that appears. The images will be superimposed with textual sentences. You can alter not only the typeface but also the font color.
You can give the words a 3D appearance. You can utilize Pixellab to download more fonts in addition to these, and you may use those in the program. These are some of the most frequent aspects of Pixellab. These fundamental pointers may be helpful for you if you do not wish to avoid becoming proficient in more complex elements of utilizing Pixellab. Some essential features of pixel lab are;
Choose the “A” Icon
Due to the small size of mobile screens, adjusting the location of text or a picture might be challenging for some users. To move words or images, click the “Position” icon and drag them to the desired location. If you are unhappy with the color of the text, you may use your preferred image as a texture. This will completely alter the appearance of the texts, making them more appealing.
Enhance Image in Pixelab
Pixellab includes standard functionality such as writing a text on images and modifying the font style and color of written text. In addition, you can significantly improve the quality of an image. Choose the “Wand” symbol that is located in the bottom-right corner.
When you click on it, you will be presented with several options that allow you to modify the contrast, brightness, and saturation. You may get a colorful appearance by using the “Hue” tool. Using the “Shadow” function included in the app, you can cast a shadow on the corner of a person’s face.
Turn Texts into 3D
After you have typed the text on an image, it is time to alter them and make them appear more attractive. Click on the symbol that looks like an “A,” select the “3DFree Articles” option from the drop-down menu that appears, and then change the ratio to suit your preferences. This will transform standard texts into 3D versions of themselves. By utilizing the Pixel Lab, you’ll be able to give the letters an impressively three-dimensional appearance.
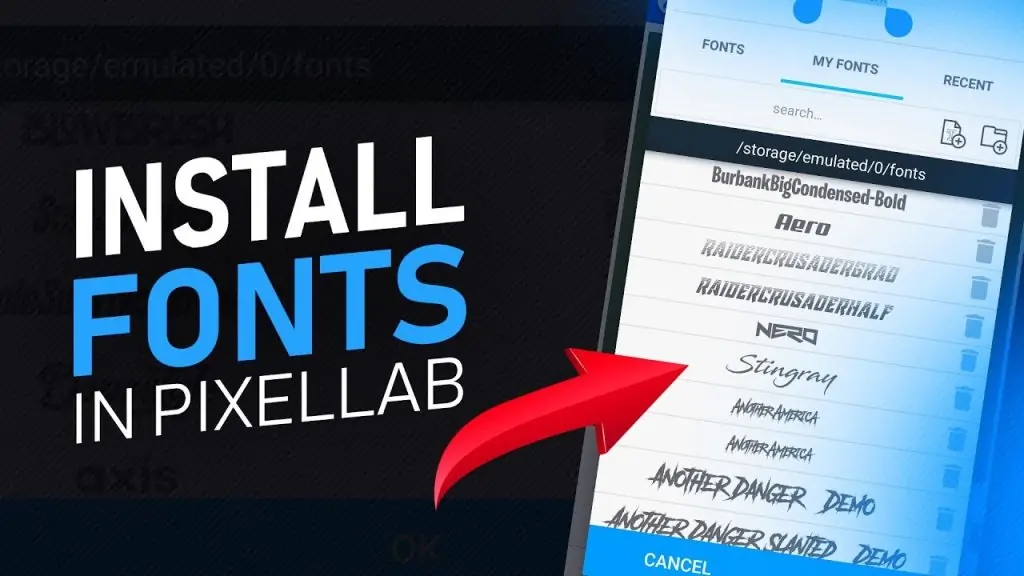
How to Download Fonts in PixelLab
You may download more fonts and use them in the editor; however, PixelLab has a selection of typefaces for you. You may utilize websites such as DaFont, which is popular in this respect, or some programs, which enable you to change or change the mobile font. For example, some applications allow you to alter or modify the portable font. It is essential to take this precaution since, according to the testing, the program only recognizes fonts.TTF format, and it is required to extract them. Look at the details down below.
How to Make Cake Toppers in PixelLab
PixelLab is a beautiful tool that may assist you in producing the cake topper with the precise dimensions you want. Please have a look at it down below.
To ensure that the dimensions are accurate, it is essential to first determine the precise size of the cake before choosing one of the available sizes.
How to Put Outline on Image in PixelLab
How to Edit Images in PixelLab
How to Make a Business Card in PixelLab
How to Take a Background Photo in PixelLab
In PixelLab, removing the backdrop will only work for photographs superimposed on a plain background. If you try it with shots of landscape or gradients, the results won’t be as good. Include a picture similar to this one in the application, and have a look at it:
You May Also Like: https://editorsmodapk.com/how-to-remove-background-in-pixellab/
How to Design a 3D Logo Using PixelLab
Since we live in a digital age, nearly every organization must have a presence on the internet. If you are seeking a way to design a logo on an Android device, you have come across the appropriate location.
People have the misconception that designing a logo is. You need to be an experienced graphic designer familiar with software programs such as Photoshop, Illustrator, and CorelDraw, amongst others. Even though that is sometimes true, you don’t always need a PC with Photoshop to make a logo for your brand. Because mobile technology has improved, anyone can make a logo for their brand on the go by using an app on their phone.
You can make a logo on your smartphone with a few different apps, but for this guide, we’ll use Pixellab to create a 3D logo on a smartphone.
Open pixel lab. After that, add the texts you want to appear on your logo using the text tool. To format your words, use the text tool. The next step is to add texture or alter the colors. You also can add shadows, although I wouldn’t advocate doing so, at least not just now. You may create the necessary forms for your logo. In the same manner, you can apply a variety of textures or colors to your forms. This tutorial used the text tool to add D and M text for a fictional digital marketing brand. Following that, we included a circular form in the design. It was specified that there should be no opacity.
The value of 20 has been set to the stroke property of the form. After centering it, move it to the rear of the layers using the circle tool. Combining each letter with the adjacent rectangle will provide the desired result. Adding gold and silver textures to the D and M lettering would look nice, respectively. (You may get the textures from here.)
When you are through adding each texture, combine all the layers, switch on the embossing tool, and set it to (90, 75, 51, 1). To use the 3D effect, turn it on and set it as follows: depth = 2, darken = 70%.
Activate the shadow tool, and then adjust the radius to be six pixels wide, with the x-axis adjusted to -5 and the y-axis adjusted to 2. Go to the tool for backgrounds and add the dark one ( you can use a colored experience or transparent background to export your logo).
Then select “ultra quality” before saving it as an image.
Recommended for you