
Pixellab is an application that can be downloaded for free on Android devices and is used to quickly and easily construct posters and write text over images and a lot of features. The app’s primary purpose was to allow users to write text on photographs, but given the abundance of helpful features, it is possible to accomplish much more with it.
The application may be downloaded for nothing from the Google Play Store. You just need to download it, and then you can use it.
We have discussed its capabilities and the several ways utilized. Look at the helpful hints and educate yourself on how to operate the pixelLab and remove the background from photos.
How to Remove Background in pixelLab
As you should now be able to understand, removing backgrounds from photos without first knowing how to make them transparent is not impossible. This is a challenge that must be overcome.
Transparency is the feature that will help you the most. It’s usually the initial step in getting pretty outstanding and one-of-a-kind edits. Making transparent backgrounds may appear to be a complicated editing method; however, in reality, it is pretty simple to accomplish, mainly if you use the appropriate apps for editing photos.
This is one of the exciting aspects of making transparent backgrounds; despite its appearance, it is pretty straightforward.
Before continuing with the step-by-step instructions, you must keep certain things in mind. You must save the photo in a particular format to have a transparent background. Deciding between the JPEG and PNG file formats will determine the outcome of this specific situation.
JPEG is used more often but doesn’t work with transparent images.
The background will become solid white if you save a picture with a transparent background as a JPEG file. If you change a photo and save it as a JPEG, the background will no longer be translucent. Instead, it will be a solid white color. You should only save images that are transparent as PNG files.
Using the PixelLab mobile app, you can quickly remove any photo’s background.
- Open the PixelLab app after it has been installed.
- Tap on the plus sign on the left side of the screen.
- Simply choose the picture you want to edit from the gallery with a simple background, then tap on the Gallery tab.
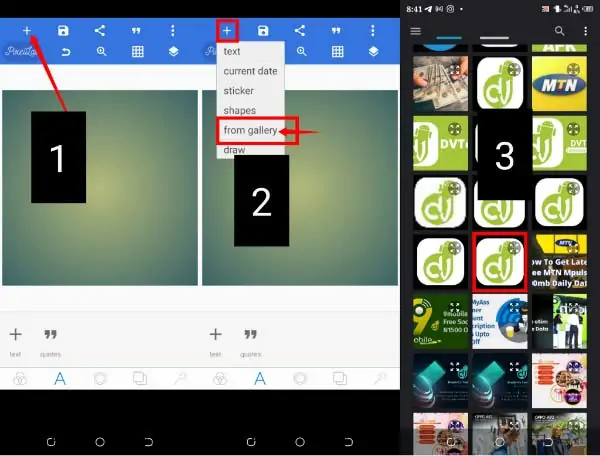
- After the image has been imported, choose the third icon from the bottom, as seen in the figure below.
- As seen in the photo, scroll to the right and select the “Erase color” tool.
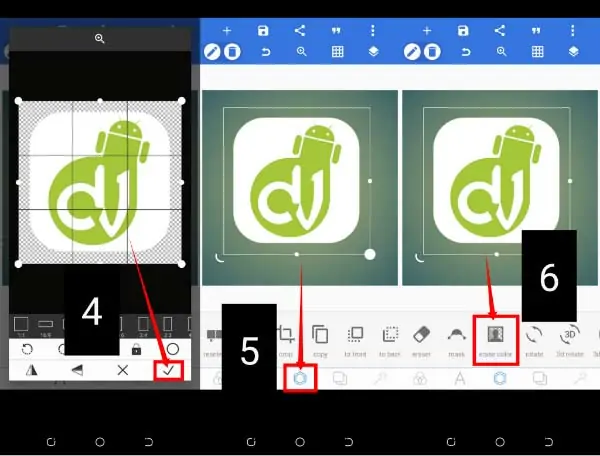
- Now tap the button with a tick that says “Enabled.”
- You can choose a color to erase the background by clicking on the pick color icon.
- You can also use the image’s tolerance tool to increase or decrease the effect of the color background eraser on the image.
- When you are perfectly satisfied, you must touch the good Tick symbol.
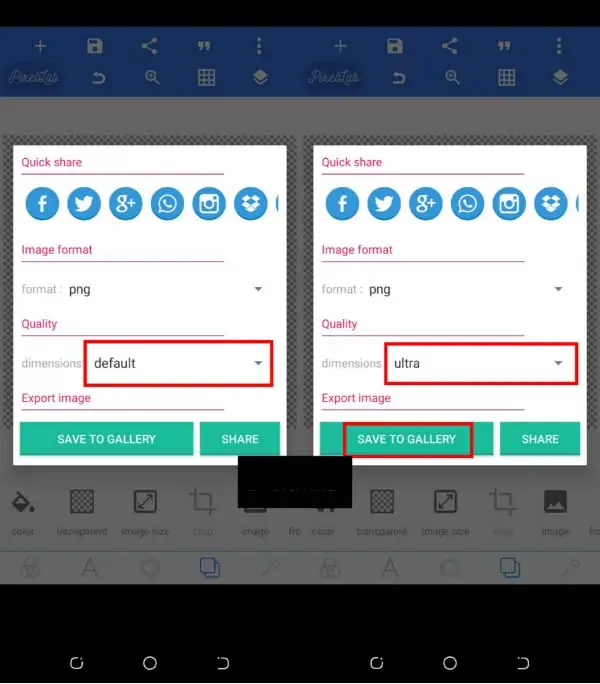
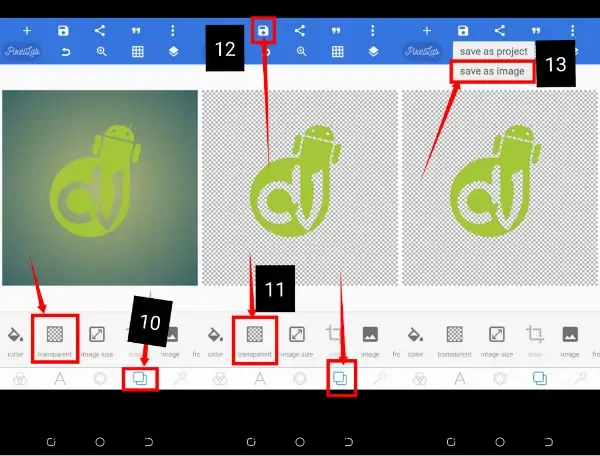
How to Save Erased or Cleared Background Images to Png (Transparent)
Follow the steps below to save a plain background image removed and erased as a png (transparency) file.
- Now, click on the fourth icon shown in the image.
- Click on the”Transparency” icon.
- Click the “Save” button, as shown in the picture.
- Change the default dimensions to ultra.
- Finally, select the “Save to Gallery” option.