
If you are a tourist or a photographer and want to capture all the beauty of nature in your camera, then have knowledge about the advantages and disadvantages of taking pictures. You will have a lot of things to capture but it will be difficult like when you are trying to capture a picture of a place which is very attractive but unfortunately there is always a rush behind it, at such a time you would think that I wish I could get rid of this crowd, in this moment people will realize how important blurring is to us.
All over the world, there are numerous editing tools that allow us to blur your image, but picsart has such easy to use features and functionality that we couldn’t find anywhere. Now we will learn step by step how to blur something on PicsArt.
How to Blur on PicsArt
Picsart is the only app that offers a bundle of blur features with different styles as its wide range of tools really makes it easy to blur the image. Follow some steps to understand and use the blur mode in picsart.
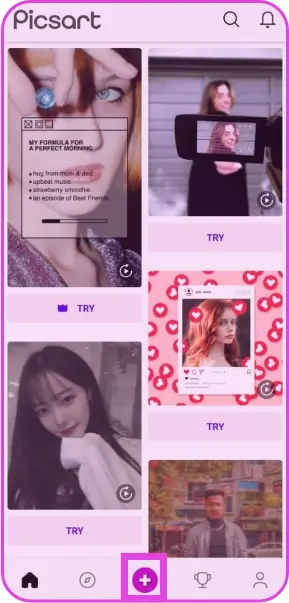
- Open the picsart mobile app, press the “+” positive icon at the bottom of the screen.
- Select your object from the gallery.
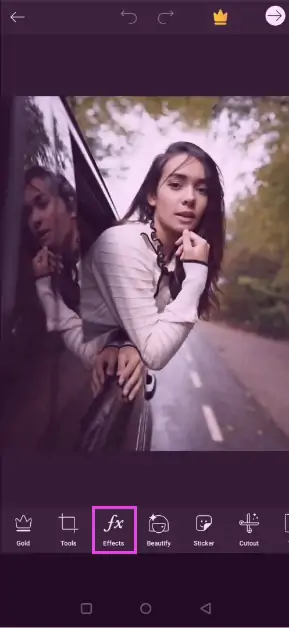
- Find the Effects tool in the toolbar and tap on the Blur option.
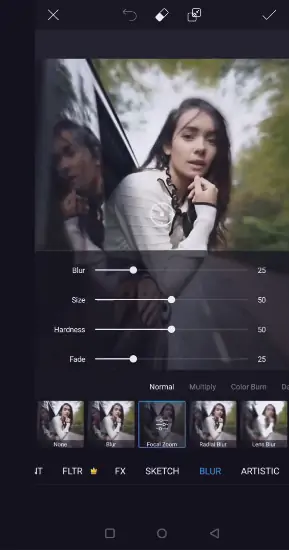
- You will see several types of blurring (such as focal, radical or motion, etc.)
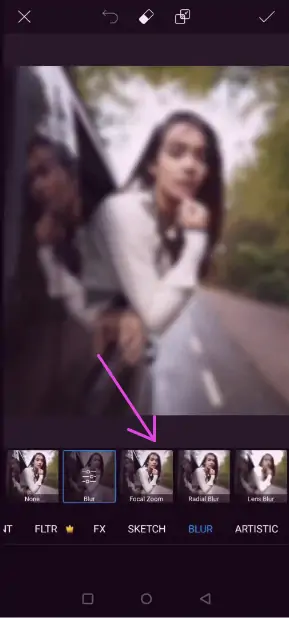
- Select one of them and adjust its size, hardness and opacity according to your wish.
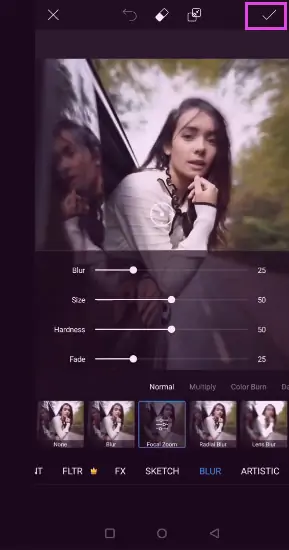
- Once you complete it, click on the top right corner arrow to save and export your edit or share it with your friend and fellows.
How to Blur Face Effect on PicsArt
Covering your face is tantamount to concealing your identity for a number of reasons, such as seeking justice for a woman who has been sexually abused and will not want her face exposed.
In some other cases, we take the image to create our business advertisements and some strangers or things passing behind the picture. In that case, we will not draw the attention of consumers to what we want to show them so that we can hide all the faces that cause disruption.
For this, picsart has introduced a blur feature in the app which has beaten its competitors with its amazing blur effects. Picsart allows us to blur those faces that you don’t want to show in your photo.
Steps to Blur Your Faces in PicsArt
- Go to the picsart app and select the image by clicking on the plus “+” icon.
- Tap on Tools.
- Then click on the selection to select the part of your image that you want to blur.
- Tap on the face with your finger so that the tool will automatically select the face from the whole picture.
- Tap Effects from the toolbar and then select the Blur tool and add blurred effects to the face of your image.
- And save it when you feel you don’t want to edit any more.
- That’s it.
How to Blur Background of Photo
The reason for blurring the background is to hide the things we don’t want to show in our picture. Suppose we are taking a picture of ourselves in a private part of our country and we do not want to show it to the public. If we are true patriots and never want our country’s privacy to be made public. In this situation, we will feel that the image background should be removed or blurred to protect our country from evil eyes. So, there are many coloring softwares out there that can blur out images but they can’t do what picsart can do. So here are some guidelines that will help blur the background of your image.
- Open picsart app and tap on “+” icon
- Upload your photo
- Click on effect in the toolbar and select blur from the menu, you can adjust filters for manually blurring.
- Now use the eraser from the menu above to remove the blur area you want to keep in focus.
- Tap the save button then download it to your phone and you can share it with your friends.
Here is the video you can follow to blur the background of your photos.
Where Can You Blur Photos on Your Phone?
If you are searching how to blur photos with a productive tool then we recommend you to use Picsart photo studio which is the largest creative platform in the world, it allows you to blur a photo with thousands of amazing and rare effects.
Some effects that are not necessary for image editing but can add a little fun to the face. So let’s take a look at some of the effects that PicsArt has introduced.
Motion Blur
Its name alone can be guessed, this effect looks amazing on things that are moving, like a moving train, men jogging on the track or something like that. Just apply all the adjustment tools and make your image more efficient.
Smart Blur
This filter makes your image look like a funny cartoon with its extra shiny effect, blurring the original purpose of the image and giving a shape that looks unreal to the viewer.
Radial Blur
Radial imagery doesn’t mean anything, it just puts a fictitious motion on your image that doesn’t happen in real life, you can change your image to a rotating shape, like ships, fighter jets and bike speed running from.
FAQs
Why Do Picsart Lose So Much Quality After Editing a Photo?
Text and stickers seem to have no effect on quality. However, the effects you apply will significantly reduce the quality and size of the final image.
Applying MAGIC fx to the image transformed it from a 1.24mb image to a 258 kb image. Unfortunately, as cool as they look, the effects ruin your photos.
How do I Give DSLR Blur Using PicsArt?
DSLR lens blur is provided entirely by a lens called a prime lens with an f-stop of 1.8 or less, or at least 2.8. Only phones with dual cameras, except for something like the Google Pixels or Nexus, because in a dual camera one camera captures the actual image while the other captures the outline of the object, which the image processing unit will work on to create blur. Pixels and nodes create blur with IPU only. Picsart only uses filters or apps from third-party services. So you can get the best.
How to Fix “Text in PicsArt is of Very Poor Quality”?
Most of the time, if the image size is too small, it will be pixelated when you confirm the text you are adding. To fix this, before adding text, images, stickers, or anything else, tap Tools and then Resize. Make sure the lowest number (width or height) is at least 1000. Confirm the resize, and then continue as you normally would.
If it doesn’t matter, I’ve noticed in the past that images or text appear blurry after saving an image, even though the total image size is quite large. It seems that some font combinations don’t match well and get distorted during the save process, in which case you will need to redo the text as one font style only or play around with which fonts work together and which ones hinder each other. I haven’t seen this issue since your last two updates, but it’s still possible I imagine.
PicsArt Apks